
Promag 53 Electromagnetic Flowmeter Quick Setup Overview
Promag 53 is a commonly used electromagnetic flowmeter in industrial sites, and its quick setup directly determines measurement accuracy and startup efficiency. This article is aimed at engineering technicians and procurement personnel, outlining the complete operation path from power-on to output verification. Mastering the standard process can significantly reduce on-site commissioning time.
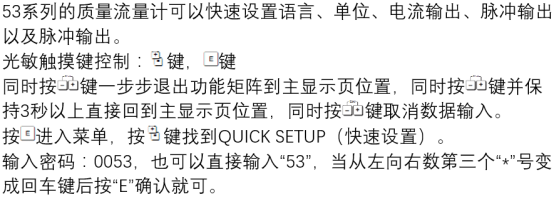
Preparation and Inspection Before Setup
Hardware and Working Condition Confirmation
- Confirm that the sensor is properly grounded and the pipe is full of flowing medium.
- Check that the power supply voltage matches the nameplate and the wiring is secure.
- Record key parameters such as pipe diameter, medium, and range.
Power-On and Self-Test
- Turn on the power and wait for the instrument to complete its self-test.
- Observe whether the display lights up normally and there are no alarm codes.
- If a fault prompt appears, first troubleshoot wiring and grounding issues.
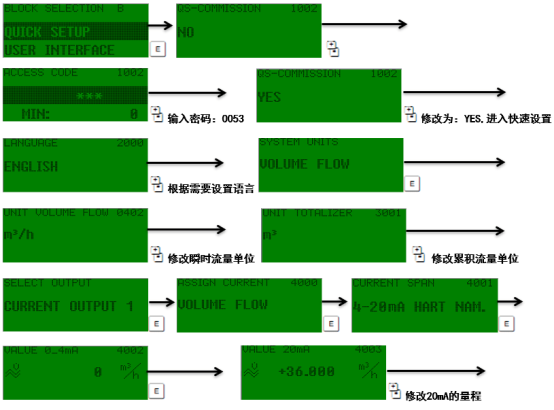
Core Parameter Quick Configuration
Common Parameters Overview
| Parameter | Description | Recommended Setting |
|---|---|---|
| Range | Corresponds to full-scale flow | Set according to process maximum flow |
| Unit | Flow display unit | Consistent with host system |
| Damping | Output response time | 1~5 seconds |
| Empty Pipe Detection | Empty pipe alarm function | Enable as needed |
Setup Steps
- Enter the main menu and select the Quick Setup wizard.
- Enter the pipe diameter, range, and unit in sequence.
- Confirm and save the parameters, then exit the menu.
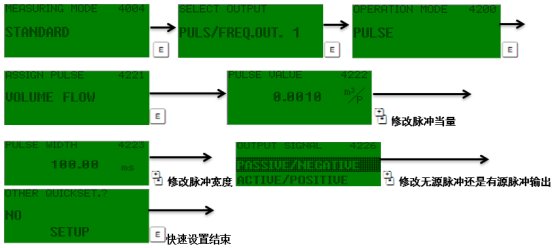
Zero Calibration and Output Verification
Zero Calibration
Ensure the pipe is full and static before performing zero calibration, which can effectively eliminate zero drift. During calibration, the medium must remain stable to avoid vibration interference.
Output Verification
- Check whether the current output corresponds to the flow rate.
- Verify that the pulse/frequency output is consistent with the host computer.
- Record the setup results for future maintenance traceability.
Common Problems and Suggestions
- Large display fluctuation: Check grounding and damping settings.
- No output signal: Confirm wiring and range configuration.
- It is recommended to periodically recalibrate the zero point to ensure long-term accuracy.