
E+H FMU4 Series Ultrasonic Level Meter Wiring and Setup Overview
E+H FMU4 Series (including FMU40, FMU41, FMU42, FMU44) are ultrasonic level meters commonly used in industrial sites. Their wiring setup mainly revolves around three parts: power, signal, and grounding. Correct wiring is the prerequisite for ensuring measurement accuracy and equipment safety.
The terminal markings of different models may vary slightly. Be sure to check the product manual before operation. The following steps apply to conventional wiring scenarios for the FMU4 series.
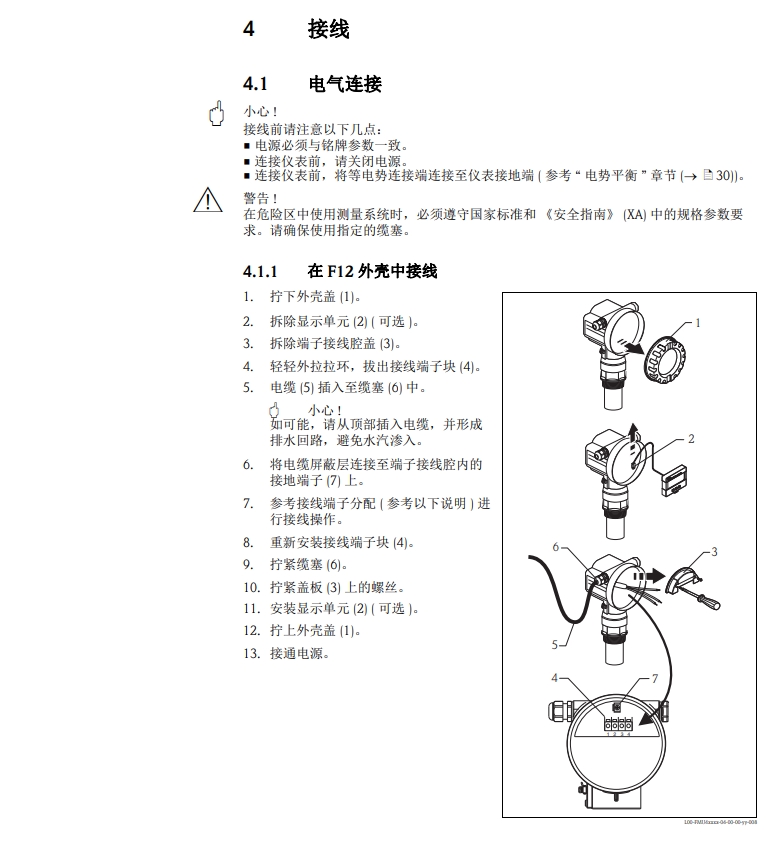
Preparation Before Wiring and Safety Precautions
Tools and Documentation Preparation
- Cables of suitable specifications and wire stripping tools
- Multimeter (for continuity and voltage checks)
- Product manual and terminal wiring diagram
Safety Precautions
- Work with the power off to avoid short circuits or electric shock caused by live wiring
- Confirm that the supply voltage matches the instrument nameplate
- In humid or explosion-proof environments, use cables and sealing connectors that meet the requirements
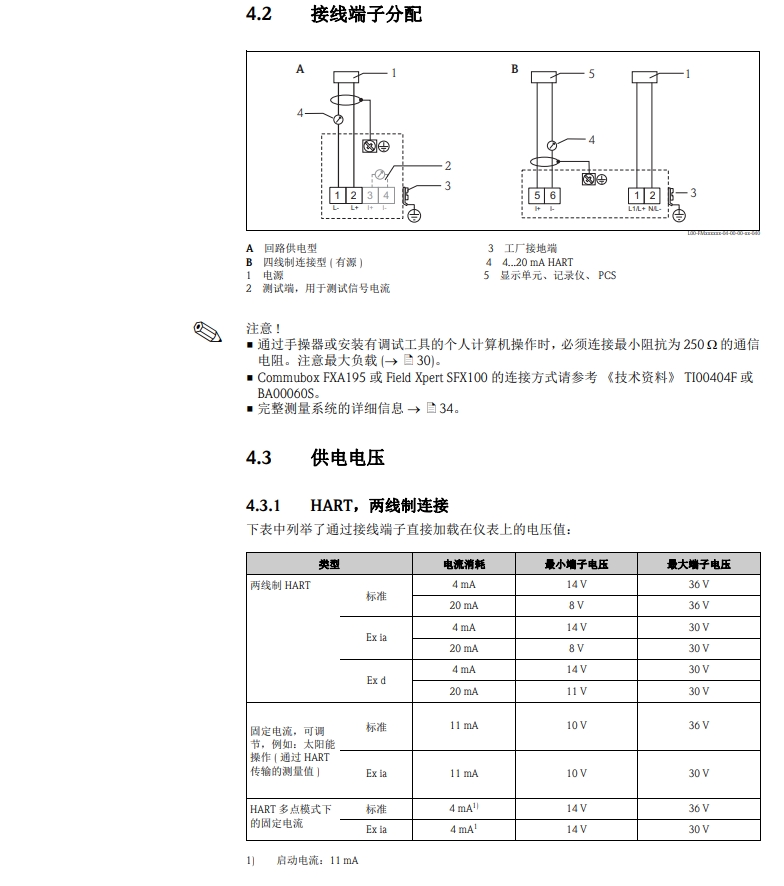
Detailed Wiring Steps for the FMU4 Series
Step 1: Power Cable Connection
Locate the power terminals marked VCC or Power. Use an appropriate cable to connect the power line and ensure the positive and negative poles are correct. Reverse connection may damage the instrument.
Step 2: Signal Cable Connection
Locate the signal output terminals marked Signal or Out. When connecting the signal cable, ensure it is secure to avoid poor contact or short circuits. Shielded cable is recommended for the signal line, with single-end grounding.
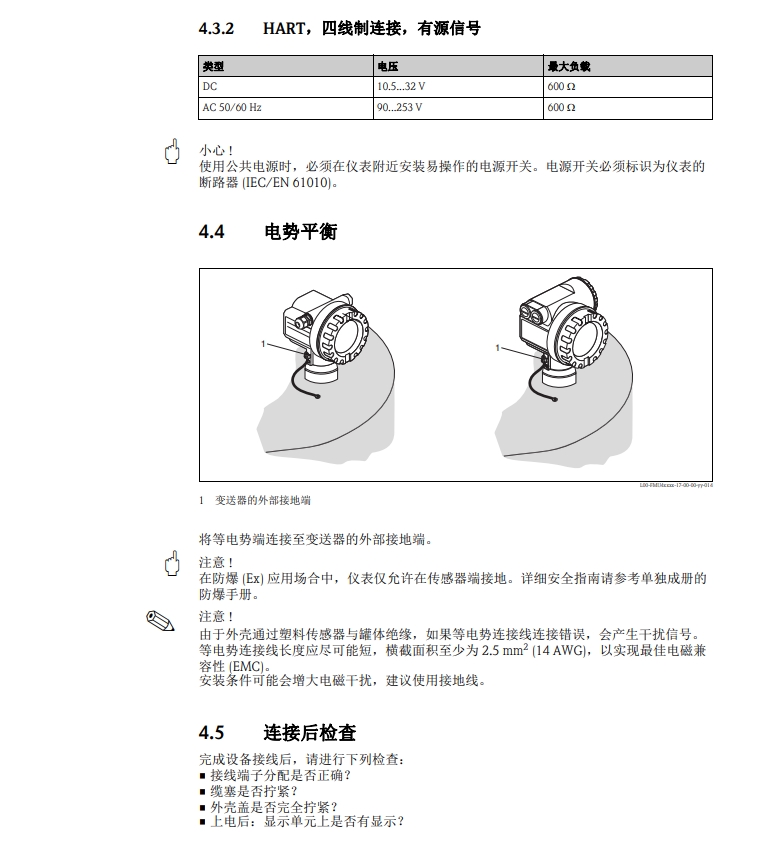
Step 3: Ground Cable Connection
Locate the grounding terminals marked GND or Earth. Connect the ground wire to ensure safe grounding of the equipment. The grounding resistance should meet on-site specification requirements.
Step 4: Wiring Inspection
After completing the wiring, check the power cable, signal cable, and ground cable one by one. Confirm that the connections are correct and secure, with no short circuits or poor contact. A multimeter can be used for continuity testing.
Step 5: Power-On Startup
After confirming that the wiring is correct, power on the level meter. Observe whether the instrument starts normally and begins measuring. If the display is normal and the output is stable, the wiring setup is successful.
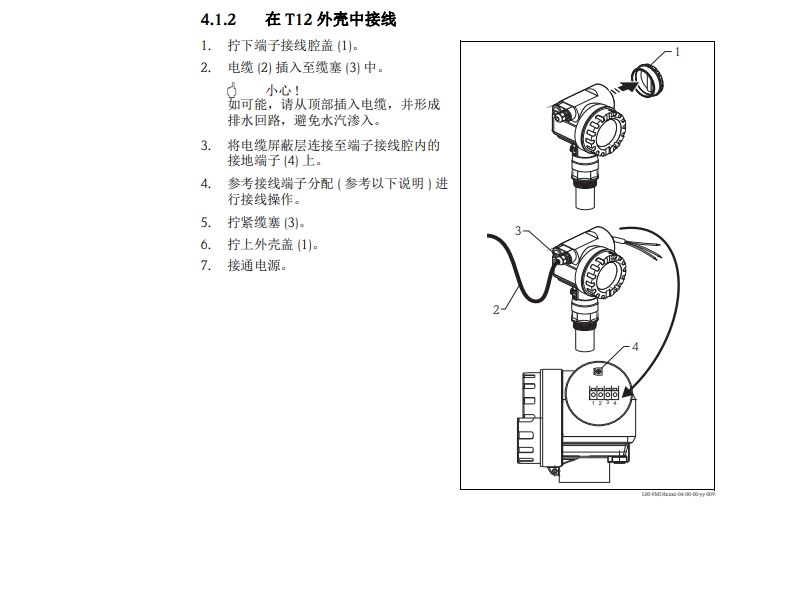
FMU4 Series Wiring Terminals and Parameter Reference
| Item | Terminal Marking | Connection Target | Precautions |
|---|---|---|---|
| Power | VCC / Power | DC or AC power supply | Positive and negative poles must not be reversed |
| Signal | Signal / Out | PLC, recorder, etc. | Shielded cable recommended, single-end grounding |
| Ground | GND / Earth | On-site grounding network | Grounding resistance meets specifications |
The parameters in the table are for general reference; the manual for the corresponding model shall prevail.FMU40, FMU41, FMU42, FMU44 may have different terminal layouts, so do not mix them up.
Common Problems and Commissioning Suggestions
No Display or Abnormal Measurement After Power-On
- Check whether the power supply voltage is within the allowable range
- Confirm that the signal line is not short-circuited or reversely connected
- Check whether the grounding is reliable
Large Fluctuation in Signal Output
- Check whether the shielding layer of the signal line is single-end grounded
- Keep away from strong interference sources such as frequency converters
- Confirm that the range and medium parameters are set correctly
When Professional Support Is Needed
If you are unsure about the wiring setup of the E+H ultrasonic level meter, it is recommended to consult the manufacturer's technical support or a professional engineer. Do not blindly attempt connections, as this may damage the instrument.
Summary
The wiring setup of the E+H FMU4 series ultrasonic level meters can be summarized into three steps: power, signal, and grounding, plus inspection and power-on verification. Strictly follow the manual and pay attention to differences in terminal markings to complete reliable wiring. Correct wiring is the foundation for long-term stable operation of the level meter.