
Overview of the Zero Adjustment Function of the 83 Series Mass Flowmeters
Zero adjustment is a key step for mass flowmeters to ensure measurement accuracy. For the 83 series mass flowmeters, correct zero calibration can effectively eliminate zero drift caused by factors such as installation stress and temperature changes. This article will introduce in detail the operating procedure, menu settings, and precautions for zero calibration, helping engineering and technical personnel and procurement personnel quickly master this function.
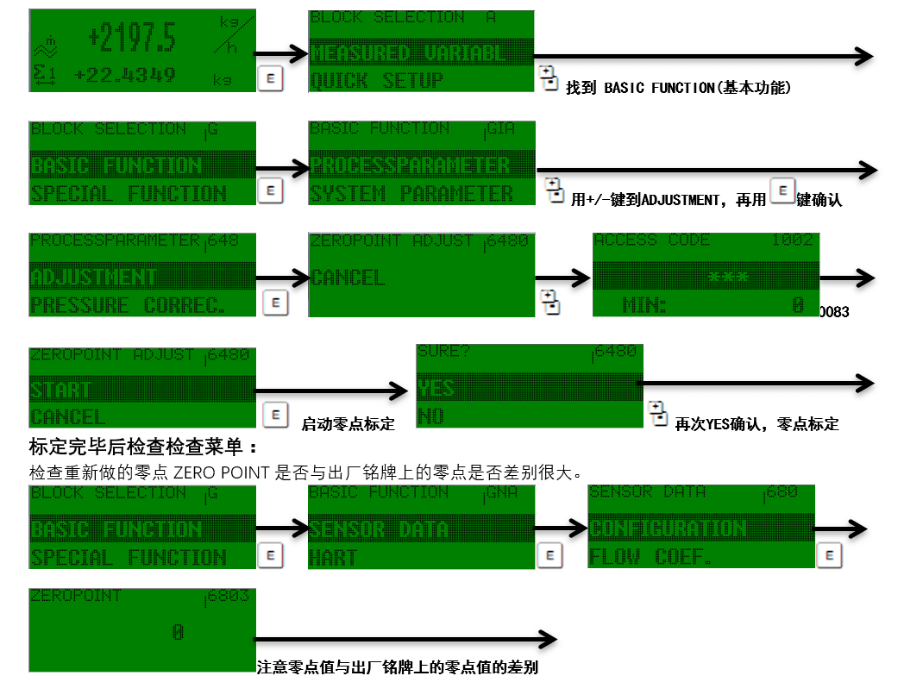
Zero Calibration Operating Steps
Zero calibration must be performed under the condition that the fluid is completely stationary. The specific steps are as follows:
- Fill the entire measuring tube with liquid, ensuring there are no bubbles in the pipeline.
- Close the rear valve first, then close the front valve, isolating the measuring tube from the process pipeline.
- Let it stand for a period of time to ensure that the fluid flow rate in the measuring tube is zero (0 m/s).
- Start zero calibration by executing the calibration program through the instrument menu or keys.
After completing the above steps, the instrument will automatically calculate and correct the zero deviation.
Photosensitive Touch Key Control and Menu Operation
Key Function Description
- "+" and "-" keys: used for numerical adjustment or menu navigation.
- "E" key: confirm input or enter the menu.
- Press "+" and "-" keys simultaneously: exit the function matrix step by step to the main display page.
- Press the white port key simultaneously and hold for more than 3 seconds: directly return to the main display page.
- Press "+" and "-" keys simultaneously: cancel data input.
Entering the Menu and Modifying the Password
Press "E" to enter the menu, and press the "+" and "-" keys to find BASIC FUNCTION. When modifying the password, enter 0083, or you can directly enter "83". When the third "*" from left to right turns into an enter key, press "E" to confirm.
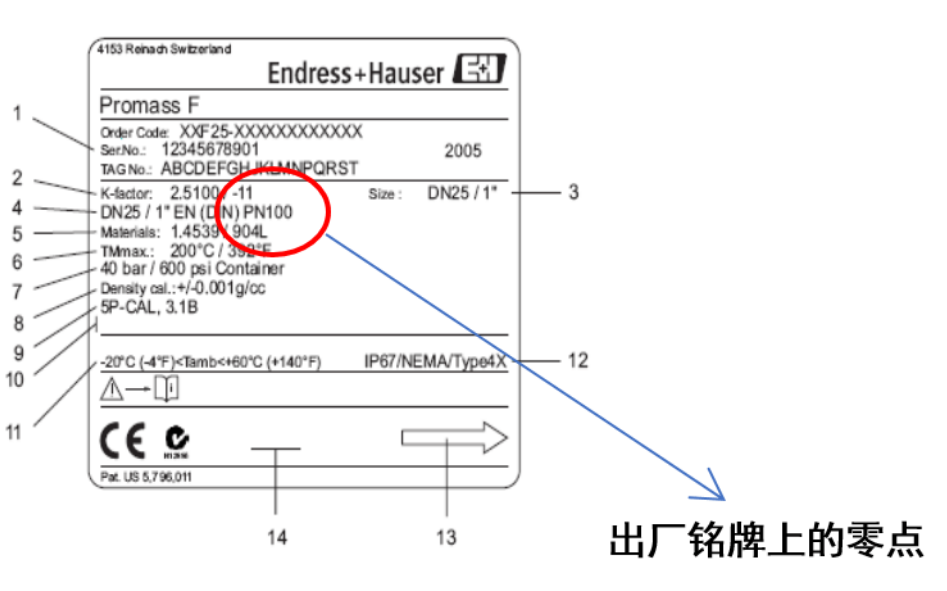
Precautions for Zero Correction
Before performing zero correction, the low flow cut-off value must be changed to zero. In this way, after the zero correction is completed, the zero fluctuation can be observed intuitively. After confirming that the zero point is stable, restore the low flow cut-off value. For how to view the low flow cut-off value, please refer to the low flow cut-off function menu table.
| Operating Step | Key Setting | Purpose |
|---|---|---|
| Before zero correction | Change the low flow cut-off value to zero | Observe zero fluctuation |
| After zero correction | Restore the low flow cut-off value | Normal measurement |
Summary
The zero adjustment function of the 83 series mass flowmeters is easy to operate, but the steps must be strictly followed. Correct use of the photosensitive touch keys and reasonable setting of the low flow cut-off value are the keys to ensuring zero calibration accuracy. It is recommended that engineering and technical personnel carefully read the relevant menu tables before operation to ensure long-term stable operation of the instrument.