
Prosonic 92F Pulse Output Setup Overview
Prosonic 92F is an ultrasonic flowmeter commonly used in industrial sites. Its pulse output function can convert flow signals into frequency signals for acquisition by PLCs, counters, and other devices. Correctly setting the pulse output is crucial for measurement accuracy and system stability. This article introduces the setup process step by step.
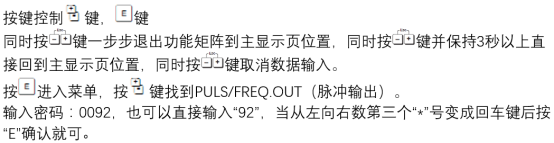
Preparation Before Setup
Confirm Hardware Connections
- Ensure that the Prosonic 92F is properly powered and in normal working condition.
- Check that the wiring between the pulse output terminals (usually terminals 24/25) and the receiving device is correct.
- Prepare a multimeter or oscilloscope to verify the output signal.
Understand Pulse Output Parameters
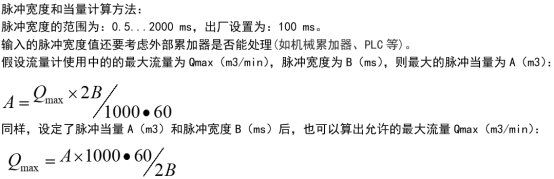
Before setup, the following parameters must be clarified: pulse equivalent (the flow volume represented by each pulse), pulse width (the duration of the output pulse), and maximum output frequency (limited by the receiving device). These parameters determine the compatibility of the pulse output.
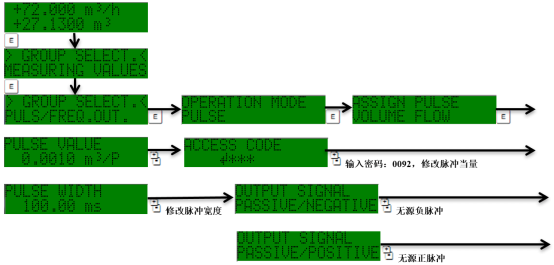
Pulse Output Setup Steps
Enter the Setup Menu
- Press the "E" key on the transmitter panel to enter the main menu.
- Use the "+" or "-" keys to navigate to the "Output Setup" menu.
- Select the "Pulse Output" submenu and press the "E" key to confirm.
Configure Pulse Parameters
- Set the pulse equivalent: according to the flow range and receiving device requirements, enter the volume corresponding to each pulse (for example, 1 pulse = 0.1 L).
- Set the pulse width: usually choose 50 ms or 100 ms to ensure that the receiving device can reliably recognize it.
- Set the output mode: select forward pulse, reverse pulse, or bidirectional pulse.
- Save the settings and exit the menu.
Verify the Output Signal
After setup is complete, simulate flow or pass actual flow, and use an oscilloscope to measure the output terminals to confirm that the pulse frequency matches the set value. If abnormal, check the wiring and parameters.
Comparison of Pulse Output Modes
| Mode | Application Scenario | Characteristics |
|---|---|---|
| Forward pulse | Unidirectional flow measurement | Outputs pulses only when flow is positive |
| Reverse pulse | Reverse flow monitoring | Outputs pulses only when flow is negative |
| Bidirectional pulse | Bidirectional flow measurement | Outputs pulses for both forward and reverse flow, and direction must be distinguished |
Common Problems and Solutions
- No pulse output: Check the power supply, wiring, and whether the parameters are enabled.
- Pulse frequency does not match: Recalculate the pulse equivalent to ensure it matches the flow range.
- Signal interference: Use shielded cables and ensure good grounding.
Summary
To correctly set the pulse output of the Prosonic 92F, it is necessary to clarify the parameters, follow the steps, and verify the signal. Following this guide can improve measurement accuracy and reduce faults. For further assistance, please refer to the product manual or contact technical support.