
Prosonic 93 User Interface Overview
Prosonic 93 is an ultrasonic level measurement instrument launched by Endress+Hauser. Its user interface is designed to be intuitive, facilitating on-site commissioning and parameter setup. The interface mainly consists of a display unit and operation keys, supporting local operation and remote configuration. Through proper menu navigation, users can quickly complete measurement configuration, output settings, and diagnostic maintenance.
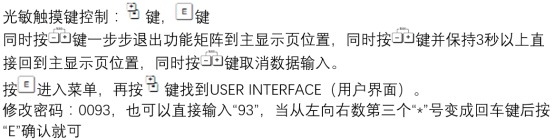
Interface Layout and Key Functions
Display Area
The display area uses a backlit LCD screen, which can show measured values, units, status icons, and menu text. In measurement mode, the main display area shows the current level or distance value; in menu mode, it displays parameter names and set values.
Operation Keys
- E: Enter menu, confirm selection, or save parameters.
- + / -: Scroll through options or modify values in the menu.
- ESC: Return to the previous menu or cancel the current operation.
By combining keys, you can quickly return to the measurement screen or lock the keyboard to prevent misoperation.
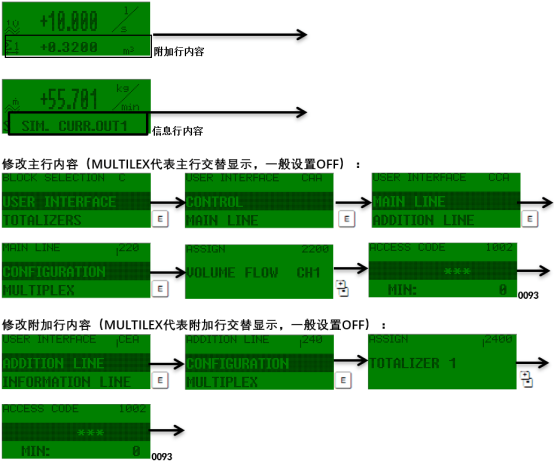
Menu Navigation and Parameter Setup Steps
Prosonic 93 uses a hierarchical menu structure, mainly including menu groups such as Measurement Setup, Output Setup, Display Setup, and Diagnostics. The following is the basic setup procedure:
- Press the E key to enter the main menu, and use the +/- keys to select the target menu group.
- Press the E key to enter the submenu and continue selecting specific parameters.
- Press the E key to edit the parameter value, and use the +/- keys to adjust the value or option.
- Press the E key to confirm and save, and press the ESC key to return to the previous menu.
After completing all settings, press the ESC key multiple times until returning to the measurement screen. The instrument will automatically apply the new parameters.
Comparison of Common Setup Parameters
The following table lists common setup parameters in the Prosonic 93 user interface and their descriptions, making it easy for engineering personnel to quickly reference.
| Parameter Name | Function Description | Typical Setting Value |
|---|---|---|
| Measurement Mode | Select level or distance measurement | Level |
| Empty Tank Height | Set the reference distance from the probe to the tank bottom | According to actual site conditions |
| Full Tank Height | Set the distance from the probe to the highest level | According to actual site conditions |
| Output Current | Set the 4-20 mA corresponding level range | 4 mA corresponds to empty tank, 20 mA corresponds to full tank |
| Display Unit | Select display unit (m, cm, mm, ft, etc.) | m |
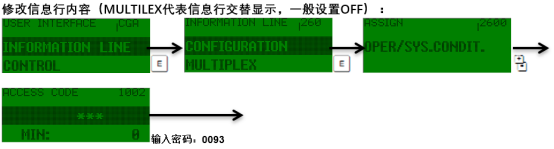
Setup Precautions and Best Practices
- Before modifying parameters, it is recommended to record the original set values for easy restoration.
- Ensure that Empty Tank Height and Full Tank Height are set accurately; otherwise, measurement accuracy will be affected.
- If there is agitation or foam on site, appropriately adjust the response speed or enable the filtering function.
- After completing the setup, use the Diagnostics menu to check the instrument status and ensure there are no alarms.
By following the above steps, you can efficiently complete the Prosonic 93 user interface setup, improving commissioning efficiency and measurement reliability.