
Promag 10 5XBB Commissioning Wizard Overview
Promag 10 5XBB is an electromagnetic flowmeter in the Promag 10 series under Endress+Hauser, widely used for flow measurement of water, wastewater, and industrial process fluids. Its built-in commissioning wizard guides users step by step through instrument startup, reducing the threshold for on-site commissioning.
This article summarizes the commissioning overview of the Promag 10 5XBB from four dimensions: pre-commissioning preparation, wizard operation procedure, key parameter settings, and common issues, for reference by engineering technicians and procurement personnel.
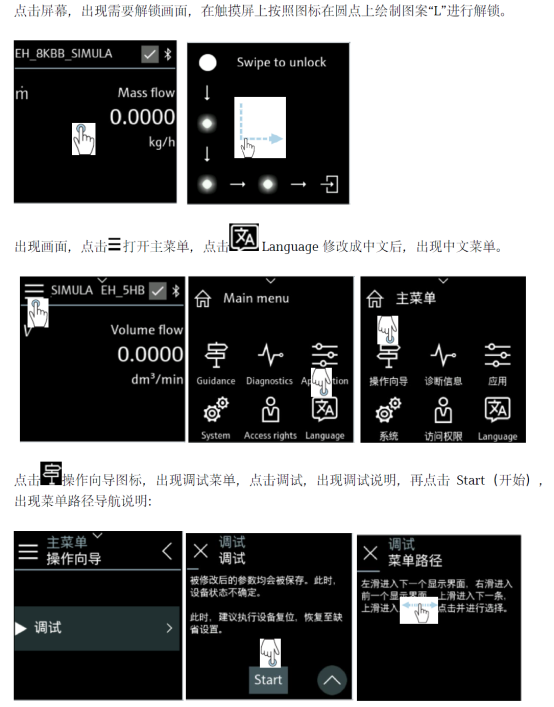
Pre-commissioning Preparation
Hardware and Wiring Check
- Confirm that the sensor and transmitter models match, and the nameplate parameters are consistent with the ordering information.
- Check whether the power supply voltage meets the nameplate requirements, usually 24 VDC or 85–260 VAC.
- Confirm that the grounding ring or grounding electrode is correctly installed to ensure equipotential of the measuring circuit.
- Check that the signal cable and power cable are routed separately to avoid electromagnetic interference.
Environment and Medium Confirmation
- Confirm that the fluid in the pipe is full and the flow direction is consistent with the sensor arrow.
- Confirm that the medium conductivity meets the minimum requirement of the electromagnetic flowmeter, generally not less than 5 µS/cm.
- Confirm that the ambient temperature, process temperature, and pressure are within the allowable range of the instrument.
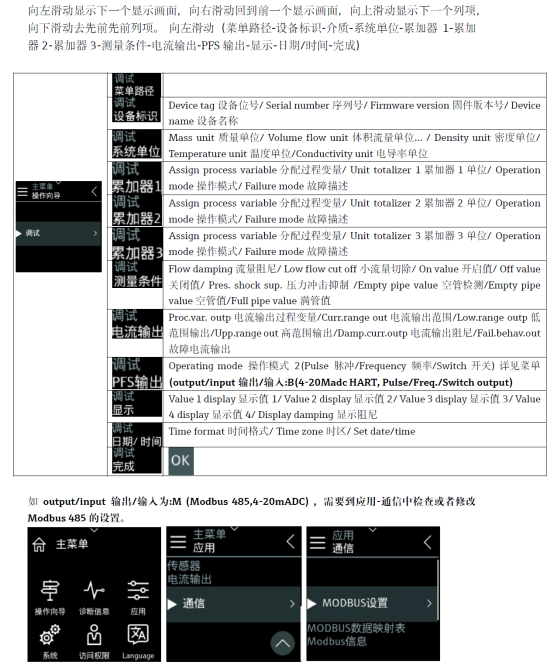
Commissioning Wizard Operation Procedure
Wizard Startup and Language Selection
- After power-on, enter the main menu and select the Commissioning wizard.
- Select the operating language; by default, multiple language interfaces such as English, German, and Chinese are supported.
- Confirm whether to restore factory settings; for first commissioning, it is recommended to select "No".
Core Parameter Setting Steps
- Set the engineering units, such as m³/h, L/min, etc.
- Enter the pipe parameters, including nominal diameter DN and wall thickness.
- Set the measuring range, including full scale value and low flow cutoff value.
- Configure the output signal, such as 4–20 mA, pulse/frequency output, or HART.
- Set the damping time to suppress output fluctuation.
- After completion, save the parameters; the wizard automatically exits and enters measurement mode.
Key Parameter Reference Table
| Parameter Item | Typical Setting | Description |
|---|---|---|
| Engineering unit | m³/h | Select according to process requirements |
| Full scale | Set according to maximum flow | Recommended to be 1.2–1.5 times the common flow |
| Low flow cutoff | 1%–3% of full scale | Suppress false counting at low flow |
| Damping time | 1–5 s | Increase appropriately when fluctuation is large |
| Output mode | 4–20 mA + HART | Configure according to control system requirements |
Post-commissioning Verification and Common Issues
Verification Points
- Check whether the empty pipe detection function works normally; when the pipe is empty, an alarm should be triggered or a low value output.
- Compare the on-site display value with the host computer reading; the deviation should be within the allowable range.
- Confirm that there are no abnormalities in alarms and diagnostic information, and perform zero point calibration if necessary.
Troubleshooting Common Issues
- Large display fluctuation: Check grounding and whether the medium contains bubbles; appropriately increase the damping time.
- No flow signal: Confirm that the pipe is full, conductivity meets the standard, and wiring is correct.
- Output deviation: Check the range, units, and output configuration; recalibrate if necessary.
Through the Promag 10 5XBB commissioning wizard, on-site personnel can complete instrument startup in a relatively short time, reducing human setting errors and improving the reliability and consistency of the measurement system.