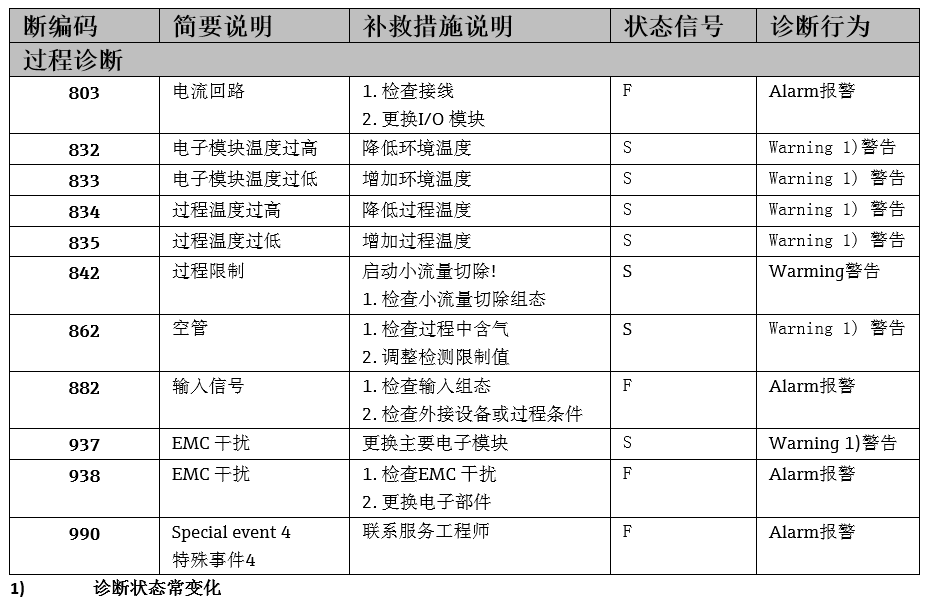
Promag 400 Alarm Code Overview
Promag 400 is an electromagnetic flowmeter produced by Endress+Hauser and is widely used in industrial flow measurement. When the instrument detects an abnormality, it indicates the fault type through alarm codes. Correctly interpreting alarm codes is the key to quickly troubleshooting faults. This article summarizes the common alarm codes of the Promag 400 and their handling methods for reference by engineering and technical personnel and procurement personnel.
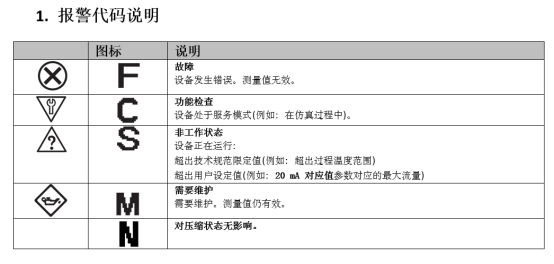
Common Alarm Codes and Meanings
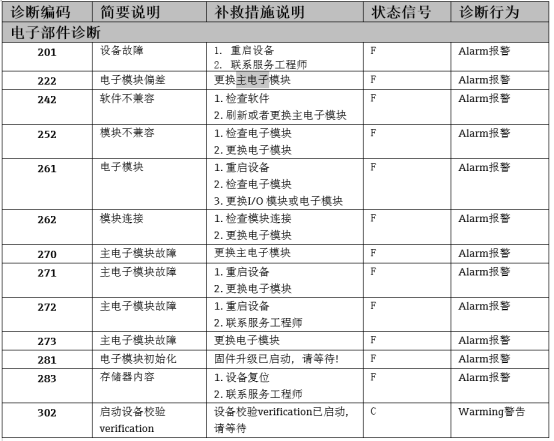
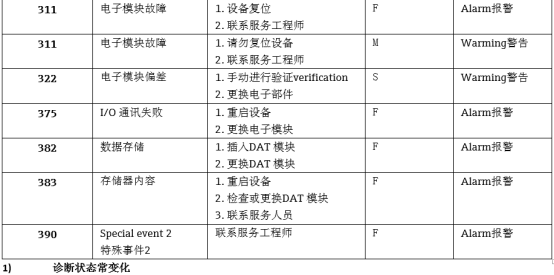
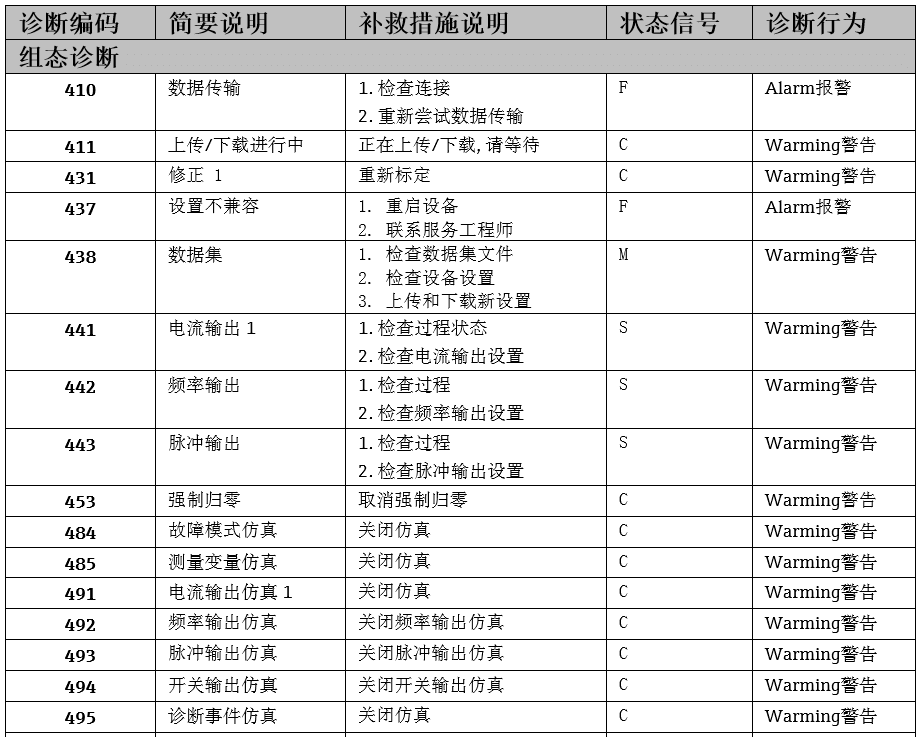
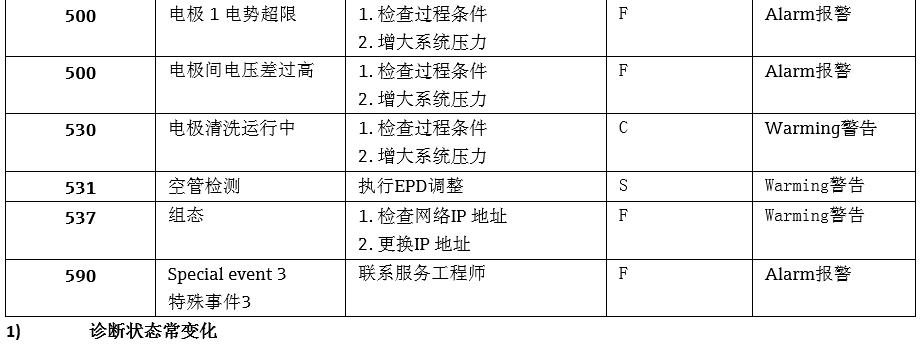
The alarm codes of the Promag 400 usually begin with the letters S, M, or F, representing different severity levels. Typical codes and their meanings are listed below.
System Alarms (S Series)
- S001: EEPROM checksum error, usually requires replacement of the electronics module.
- S002: RAM test failed, may require restart or replacement of the mainboard.
- S003: ROM checksum error, requires contacting the manufacturer for repair.
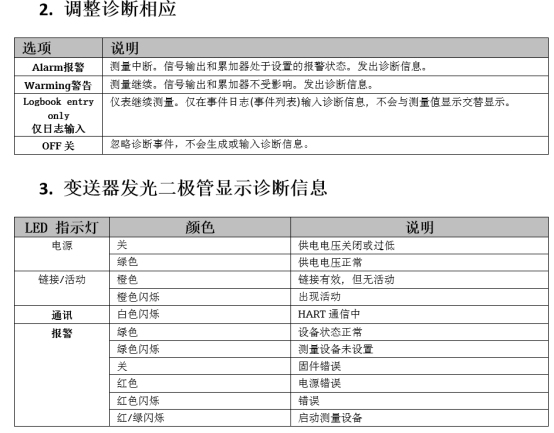
Measurement Alarms (M Series)
- M001: Empty pipe detection alarm, check whether the pipe is full or whether the conductivity of the medium is too low.
- M002: Excitation current abnormal, check the sensor coil and cable connections.
- M003: Flow rate over range, adjust the range or check process parameters.
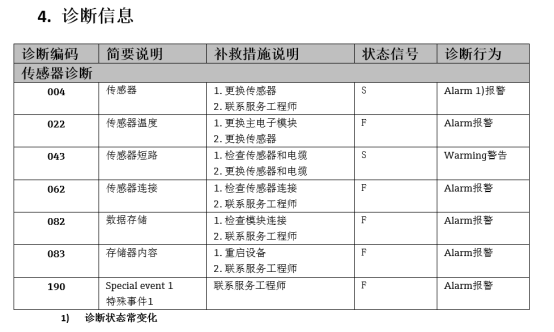
Fault Alarms (F Series)
- F001: Sensor fault, check the electrodes and coil.
- F002: Electronics module fault, requires replacement.
- F003: Power supply fault, check the supply voltage.
Alarm Code Troubleshooting Steps
When an alarm occurs, it is recommended to troubleshoot according to the following steps to quickly locate the problem.
- Record the alarm code: Check the display or read the specific code via HART/Profibus.
- Consult the manual: Confirm the meaning of the code against the Promag 400 manual.
- Check process conditions: Confirm whether the pipe is full, the medium conductivity, the flow range, etc. are normal.
- Check electrical connections: Including power supply, grounding, signal cables, and sensor connections.
- Restart the instrument: Try powering off and restarting to see whether the alarm disappears.
- Contact technical support: If it cannot be resolved, contact Endress+Hauser or professional maintenance personnel.
Alarm Code Quick Reference Table
The table below summarizes the common alarm codes of the Promag 400 and their possible causes and handling methods for quick reference.
| Alarm Code | Meaning | Possible Cause | Handling Method |
|---|---|---|---|
| S001 | EEPROM checksum error | Electronics module fault | Replace electronics module |
| S002 | RAM test failed | Mainboard fault | Restart or replace mainboard |
| S003 | ROM checksum error | Firmware corruption | Contact manufacturer for repair |
| M001 | Empty pipe detection alarm | Pipe not full or low conductivity | Check pipe and medium |
| M002 | Excitation current abnormal | Coil or cable fault | Check coil and cable |
| M003 | Flow rate over range | Process parameter changes | Adjust range |
| F001 | Sensor fault | Electrode or coil damage | Check sensor |
| F002 | Electronics module fault | Module damage | Replace module |
| F003 | Power supply fault | Abnormal power supply | Check power supply |
Preventive Maintenance Recommendations
To reduce the occurrence of alarms, it is recommended to perform the following maintenance regularly:
- Regularly inspect the sensor electrodes and clean dirt.
- Check cable connections and grounding to ensure reliability.
- Regularly verify instrument parameters to avoid incorrect settings.
- Keep the pipe full to avoid empty pipe operation.
Summary
The alarm codes of the Promag 400 are an important tool for instrument self-diagnosis. Mastering the meanings and handling methods of common codes can significantly improve troubleshooting efficiency. Users are advised to save the quick reference table and perform regular maintenance to ensure the long-term stable operation of the flowmeter.