
Overview of Setting the Current Output Range for Prosonic 91
Prosonic 91 is a commonly used ultrasonic level meter in industrial sites. The setting of its 4-20mA current output range directly affects the accurate transmission of measurement data. Correctly configuring the range ensures that the signal received by the host computer linearly corresponds to the actual level.
Based on operation interface screenshots, this article explains the setting process step by step, suitable for engineering commissioning and procurement acceptance reference.
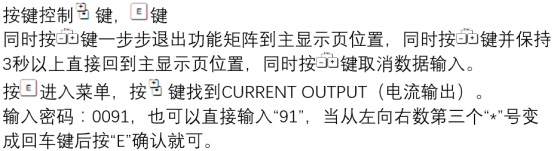
Preparation Before Setting
Tool and Parameter Confirmation
- Confirm that the Prosonic 91 is powered on and in measurement mode.
- Prepare a HART communicator or the device's local display panel.
- Record the current level corresponding to 4mA and the level corresponding to 20mA.
Safety Precautions
- Before setting, ensure the process is in a safe state to avoid accidental triggering of interlocks.
- If operating in an explosive atmosphere, use an intrinsically safe communicator.
Steps for Setting the Current Output Range
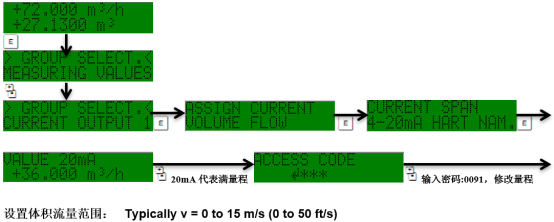
Step 1: Enter the Output Setting Menu
- Enter the main menu via local buttons or a HART communicator.
- Select the "Output" or "Current Output" option.
- Enter the "Range Setting" submenu.
Step 2: Adjust the Values Corresponding to 4mA and 20mA
- Enter the level corresponding to 4mA (usually the lowest level, such as 0%).
- Enter the level corresponding to 20mA (usually the highest level, such as 100%).
- Confirm that the unit matches the site (m, cm, %, etc.).
- Save the parameters and exit the menu.
Step 3: Verify the Output
- Use a multimeter in series to measure the current output and check whether 4mA and 20mA correspond to the set levels.
- If the deviation exceeds ±0.1mA, recalibrate or check the loop load.
Reference for Key Parameters and Default Values
| Parameter | Description | Typical Value |
|---|---|---|
| Level corresponding to 4mA | Output lower limit | 0 m or 0% |
| Level corresponding to 20mA | Output upper limit | Full scale m or 100% |
| Output type | Current mode | 4-20mA |
| Damping time | Response smoothing | 0-10 s |
Common Issues and Troubleshooting
No Change in Output Current
- Check whether the range upper and lower limits are reversed.
- Confirm whether the loop power supply is normal (24VDC).
- Check whether the HART communication is forcing a fixed current.
Large Output Current Deviation
- Re-execute the 4mA and 20mA fine adjustment.
- Check whether the load resistance is within the allowable range (usually ≤500Ω).
Summary
Correctly setting the Prosonic 91 current output range is key to ensuring level measurement accuracy. By following the above steps and verifying with a multimeter, commissioning can be completed quickly.
If the site conditions are complex, it is recommended to use a HART communicator for online diagnostics to ensure long-term stable operation.