
Prosonic 93 Quick Setup and Commissioning Overview
Prosonic 93 is a high-performance ultrasonic flowmeter widely used in industrial process measurement. Proper quick setup and commissioning are key to ensuring measurement accuracy and stable operation. This guide is intended for engineering technicians and procurement personnel, providing a complete process from installation checks to parameter configuration.
Before commissioning, please ensure you have read the product manual and prepared the necessary tools and parameters. The following steps will help you efficiently complete instrument commissioning.
Preparation Before Commissioning
1. Installation Check
- Confirm that the sensor installation position meets requirements, and the upstream and downstream straight pipe lengths satisfy 10D upstream and 5D downstream (D is the pipe inner diameter).
- Check whether the coupling between the sensor and the pipe is good, with no bubbles or impurities.
- Ensure the cable connection is secure and the shielding layer is reliably grounded.
2. Tool and Parameter Preparation
- Prepare a HART communicator or a laptop (with commissioning software).
- Record pipe parameters: outer diameter, wall thickness, material, lining, medium type, etc.
- Confirm that the power supply voltage matches the instrument nameplate.
Quick Setup Steps
1. Power-On and Initialization
- Turn on the power; after self-test, the instrument enters the measurement interface.
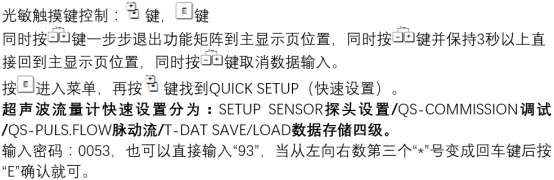
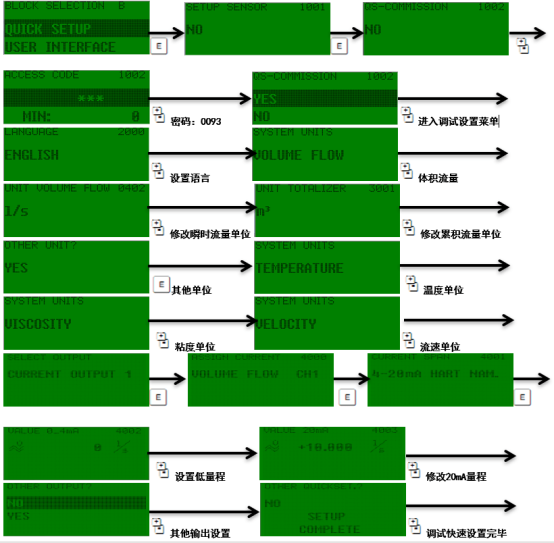
- Press the E key to enter the main menu and select "Quick Setup".
- Select the language and unit system according to the prompts.
2. Pipe Parameter Input
- Enter the pipe outer diameter and wall thickness; the instrument automatically calculates the inner diameter.
- Select the pipe material and lining material to ensure correct sound velocity parameters.
- Enter the medium type (such as water, sewage, oil, etc.) and temperature.
3. Sensor Installation Parameters
- Select the sensor installation method (V method, Z method, or N method).
- Enter the sensor spacing and ensure it matches the measured value.
- Confirm that the installation direction is consistent with the flow direction arrow.
4. Output and Alarm Settings
- Configure the 4-20mA output corresponding to the flow range.
- Set pulse output or frequency output (if required).
- Enable empty pipe alarm, fault alarm, etc.
Parameter Configuration Reference Table
| Parameter Item | Typical Value/Option | Description |
|---|---|---|
| Pipe outer diameter | Input according to actual conditions | Unit: mm |
| Wall thickness | Input according to actual conditions | Unit: mm |
| Medium | Water, sewage, oil, etc. | Affects sound velocity |
| Installation method | V method, Z method, N method | Select according to pipe diameter |
| Output signal | 4-20mA | Corresponds to flow range |
Commissioning and Verification
1. Zero Calibration
When the pipe is filled with static medium, perform zero calibration to eliminate static errors. Ensure there is no flow or the valve is closed.
2. Signal Strength Check
Observe the signal strength indication; normally it should be greater than 60%. If it is too low, check the coupling, spacing, or bubbles in the medium.
3. Flow Verification
Compare the instrument display value with the actual flow (such as container metering); the error should be within the allowable range. Adjust the correction factor if necessary.
Common Problems and Solutions
- Weak signal: Reinstall the sensor, add coupling agent, and check the pipe inner wall.
- Fluctuating readings: Confirm the medium is stable, remove bubbles, and check grounding.
- No output: Check the power supply, wiring, and output configuration.
By following the above steps, you can quickly complete the setup and commissioning of the Prosonic 93, ensuring long-term reliable operation.