
Overview of Promag 10 5XBB Date and Time Modification
Promag 10 5XBB is an electromagnetic flowmeter under Endress+Hauser, widely used in industrial flow measurement. In actual use, modifying the date and time is a common operation to ensure the accuracy of data recording timestamps.
This article will introduce step by step how to modify the date and time through the on-site display or debugging tools, with screenshots of the operation interface for reference by engineering technicians and procurement personnel.
Preparation Before Modification
Before starting the modification, please ensure you have the following conditions:
- A Promag 10 5XBB flowmeter that is powered on and in normal measurement status.
- Operation permissions (if a password is required, please prepare the corresponding level password).
- Refer to the device manual to confirm that the menu structure may vary slightly depending on the firmware version.
It is recommended to perform the modification during non-critical production periods to avoid affecting data recording.
Modifying Date and Time via On-site Display
The Promag 10 5XBB is usually equipped with a liquid crystal display and operation buttons, allowing the date and time to be modified directly on the device. The following are general steps:
- Press the E key to enter the main menu.
- Use the + or - key to select "Setup" or "System Parameters", and press E to confirm.
- Select the "Date/Time" option and press E to enter.
- Use the arrow keys to modify the year, month, day, hour, minute, and second, pressing E to confirm each item.
- Save the settings and exit, returning to the measurement interface.
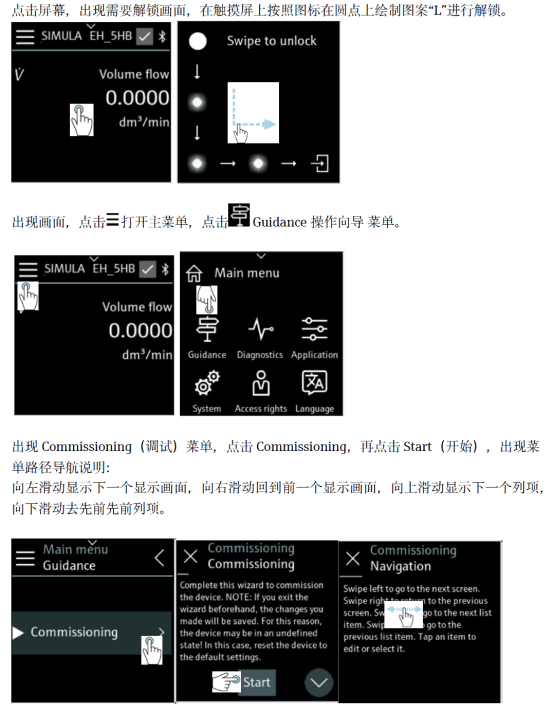
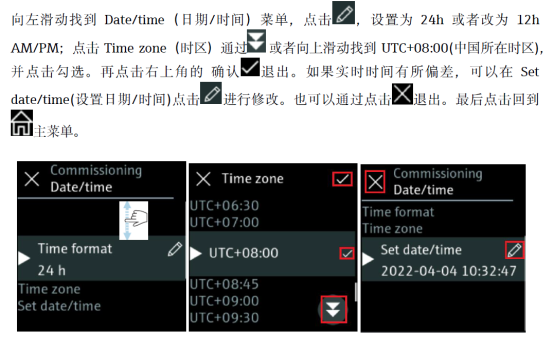
The operation interface is shown in the following figures:
Modifying Date and Time via Debugging Software
If on-site operation is inconvenient, you can use Endress+Hauser debugging software (such as FieldCare, DeviceCare) to modify via HART or Modbus interface.
- Connect the debugging tool to the flowmeter communication port.
- Open the device parameter tree in the software and find the "Date/Time" node.
- Enter the correct date and time and click write.
- Confirm the modification is successful and check whether the device display is synchronized.
This method is suitable for batch modifications or remote operations, but attention must be paid to matching communication parameters.
Common Problems and Precautions
When modifying the date and time, you may encounter the following situations:
- Insufficient permissions: The correct password must be entered, usually the default password or a user-defined password.
- Time format: The device may support 12/24-hour format; please set according to preference.
- Data impact: Modifying the time may affect historical data records; it is recommended to perform during shutdown or maintenance.
- Firmware differences: Menu paths may differ slightly between firmware versions; please refer to the actual device.
If the time is still inaccurate after modification, please check the battery or power status and contact the manufacturer's technical support if necessary.
Summary
Modifying the date and time on the Promag 10 5XBB is simple and can be done through on-site buttons or debugging software. By following the correct steps and paying attention to permissions and data impact, you can ensure accurate timestamps, providing a reliable basis for flow measurement and data analysis.