
PMX5x/FMX5x Level Setting Mode Overview
The PMX5x and FMX5x series instruments are commonly used level measurement devices in industrial fields. Their level setting mode allows users to configure key parameters such as measurement mode, pressure unit, calibration parameters, and current output through key operations. This article introduces the complete setting process step by step to help engineering technicians quickly master the operation method.
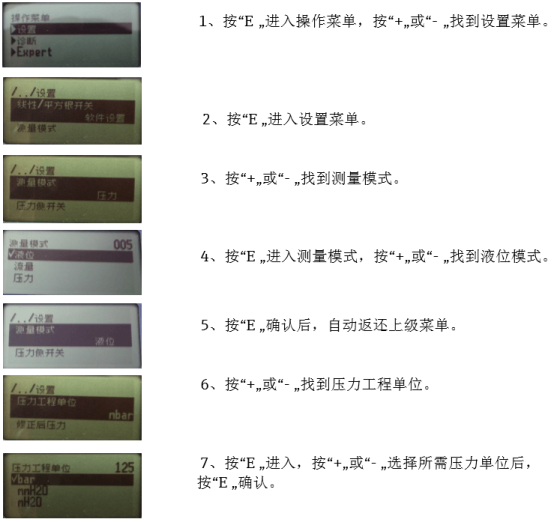
Entering the Setting Menu and Selecting Measurement Mode
Step 1: Enter the Operation Menu
- Press the "E" key to enter the operation menu.
- Press the "+" or "-" key to find the Setting Menu.
- Press the "E" key to enter the setting menu.
- Press the "+" or "-" key to find the Measurement Mode.
- Press the "E" key to enter measurement mode, and press the "+" or "-" key to find the Level Mode.
- After pressing the "E" key to confirm, it automatically returns to the upper menu.
Step 2: Set the Pressure Engineering Unit
- Press the "+" or "-" key to find the Pressure Engineering Unit.
- Press the "E" key to enter, and press the "+" or "-" key to select the desired pressure unit.
- Press the "E" key to confirm.
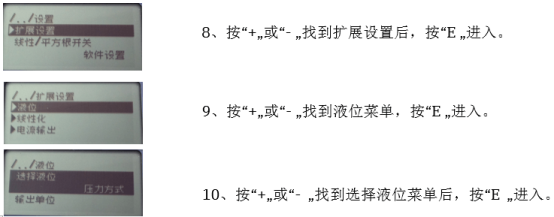
Extended Settings and Level Parameter Configuration
Step 3: Enter Extended Settings
- Press the "+" or "-" key to find Extended Settings, and press the "E" key to enter.
- Press the "+" or "-" key to find the Level Menu, and press the "E" key to enter.
- Press the "+" or "-" key to find Select Level Menu, and press the "E" key to enter.
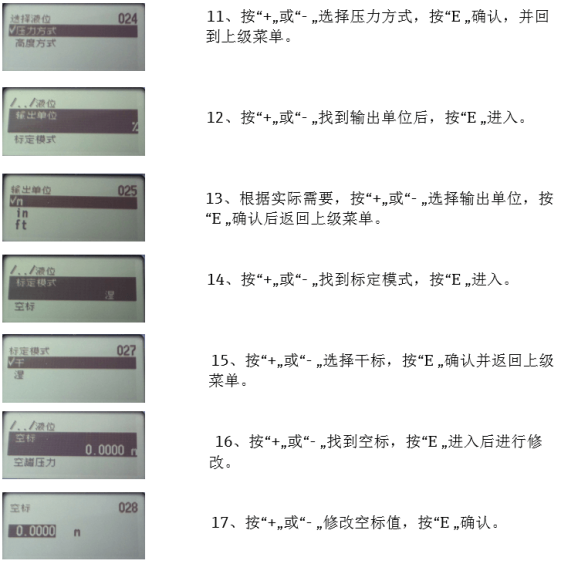
Step 4: Select Pressure Method and Output Unit
- Press the "+" or "-" key to select the Pressure Method, press the "E" key to confirm, and return to the upper menu.
- Press the "+" or "-" key to find the Output Unit, and press the "E" key to enter.
- According to actual needs, press the "+" or "-" key to select the output unit, press the "E" key to confirm, and then return to the upper menu.
Calibration Mode Settings
Step 5: Dry Calibration and Empty Calibration Settings
- Press the "+" or "-" key to find Calibration Mode, and press the "E" key to enter.
- Press the "+" or "-" key to select Dry Calibration, press the "E" key to confirm and return to the upper menu.
- Press the "+" or "-" key to find Empty Calibration, press the "E" key to enter and modify.
- Press the "+" or "-" key to modify the empty calibration value, press the "E" key to confirm, and then press the "E" key to return to the upper menu.
- Repeat steps 1-4 to set dry calibration and empty calibration again (if needed).
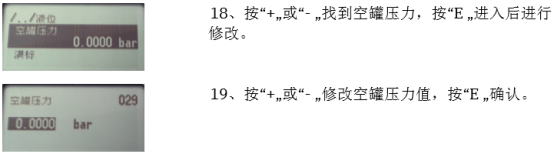
Step 6: Empty Tank Pressure and Full Scale Settings
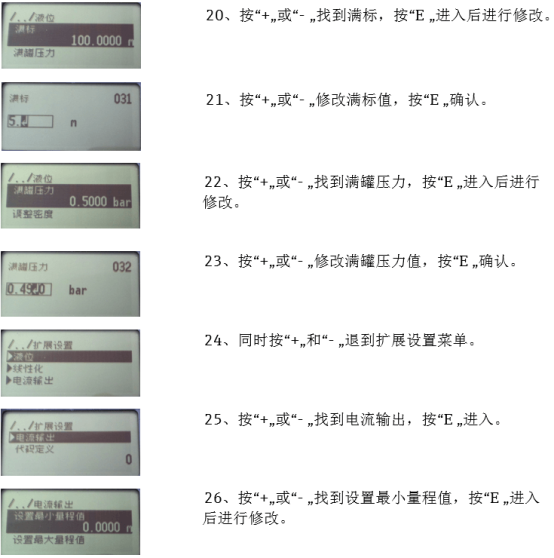
- Press the "+" or "-" key to find Empty Tank Pressure, press the "E" key to enter and modify.
- Press the "+" or "-" key to modify the empty tank pressure value, press the "E" key to confirm.
- Press the "+" or "-" key to find Full Scale, press the "E" key to enter and modify.
- Press the "+" or "-" key to modify the full scale value, press the "E" key to confirm.
- Press the "+" or "-" key to find Full Tank Pressure, press the "E" key to enter and modify.
- Press the "+" or "-" key to modify the full tank pressure value, press the "E" key to confirm.
Current Output and Range Settings
Step 7: Set Current Output
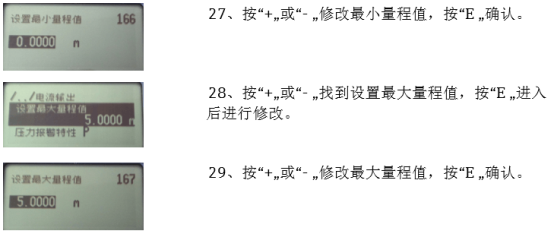
- Press the "+" and "-" keys simultaneously to return to the extended settings menu.
- Press the "+" or "-" key to find Current Output, and press the "E" key to enter.
- Press the "+" or "-" key to find Set Minimum Range Value, press the "E" key to enter and modify.
- Press the "+" or "-" key to modify the minimum range value, press the "E" key to confirm.
- Press the "+" or "-" key to find Set Maximum Range Value, press the "E" key to enter and modify.
- Press the "+" or "-" key to modify the maximum range value, press the "E" key to confirm.
Zero Adjustment and Completing Settings
Step 8: Zero Adjustment
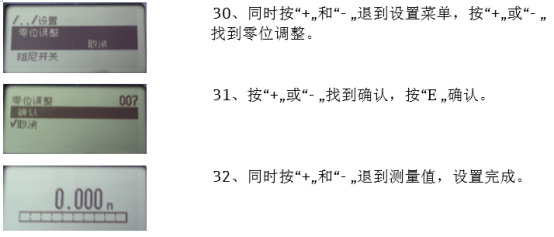
- Press the "+" and "-" keys simultaneously to return to the setting menu, and press the "+" or "-" key to find Zero Adjustment.
- Press the "+" or "-" key to find Confirm, and press the "E" key to confirm.
- Press the "+" and "-" keys simultaneously to return to the measured value, and the setting is complete.
Key Parameter Summary
| Parameter | Description | Optional Value/Unit |
|---|---|---|
| Measurement Mode | Select level mode | Level |
| Pressure Engineering Unit | Pressure display unit | According to instrument support |
| Output Unit | Output signal unit | According to actual needs |
| Calibration Mode | Dry calibration or wet calibration | Dry calibration |
| Empty Calibration Value | Calibration value when the tank is empty | Numerical value |
| Full Scale Value | Calibration value when the tank is full | Numerical value |
| Empty Tank Pressure | Pressure value when the tank is empty | Numerical value |
| Full Tank Pressure | Pressure value when the tank is full | Numerical value |
| Minimum Range Value | Lower limit of current output | Numerical value |
| Maximum Range Value | Upper limit of current output | Numerical value |
Through the above steps, users can complete the level setting of PMX5x/FMX5x. During operation, please ensure to proceed in order and pay attention to confirming the save of each step. If you have any questions, please refer to the instrument manual or contact technical support.