
Prosonic 93 Current Output Range Setting Overview
Prosonic 93 is an ultrasonic level meter commonly used in industrial sites, and its 4-20mA current output range setting directly affects the accuracy of signal acquisition. Correctly configuring the range ensures that the level signal received by the host computer is consistent with the actual working conditions. This article is intended for engineering technicians and procurement personnel and provides clear operating guidance.
Preparation Before Setting
Tool and Parameter Confirmation
- Confirm that the Prosonic 93 is powered on and in normal measurement status.
- Prepare a HART communicator or on-site display module (such as VU331).
- Record the level values corresponding to the current empty tank height and full tank height.
- Confirm that the output channel is current output (usually 4-20mA).
Safety Precautions
- When operating in hazardous areas, an intrinsically safe communicator must be used.
- Before modifying the range, it is recommended to switch the instrument to offline/manual mode to avoid accidentally triggering interlocks.
Current Output Range Setting Steps
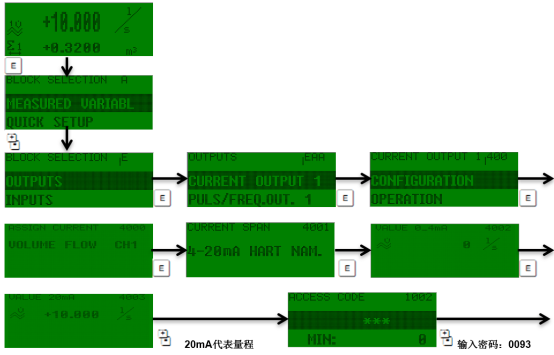
Enter the Parameter Menu
- Enter the main menu through the on-site display or HART communicator.
- Select Setup → Output → Current Output.
- Find the Range Setting submenu.
Configure the Values Corresponding to 4mA and 20mA
- Set the level corresponding to 4mA (usually 0% or the empty tank value).
- Set the level corresponding to 20mA (usually 100% or the full tank value).
- Confirm that the unit is consistent with the site (m, %, ft, etc.).
- Save the parameters and exit the menu.
Key Parameters and Recommended Values
| Parameter | Description | Recommended Value |
|---|---|---|
| Level corresponding to 4mA | Lower limit of output current | 0% or empty tank height |
| Level corresponding to 20mA | Upper limit of output current | 100% or full tank height |
| Output mode | Current direction | Standard 4-20mA |
| Damping time | Signal smoothing | 1-5 seconds (depending on working conditions) |
Common Problems and Troubleshooting
Current Output Does Not Change
- Check whether the upper and lower range limits are set in reverse.
- Confirm whether the level is within the range.
- Check whether the loop power supply is normal (minimum 12V).
Output Value Does Not Match Actual Value
- Recalibrate the empty tank calibration.
- Check whether the medium sound velocity setting is correct.
- Confirm that there is no false echo interference.
Summary
Correctly setting the Prosonic 93 current output range is the key to ensuring accurate transmission of the level signal. By following the above steps and adjusting damping and units according to on-site working conditions, measurement stability can be effectively improved. It is recommended to perform a loop test before commissioning to ensure that 4mA and 20mA correspond correctly.