
Overview of Modifying Modbus Parameters on Promag 400
The Promag 400 is an electromagnetic flowmeter launched by Endress+Hauser that supports the Modbus communication protocol. Correctly modifying Modbus parameters is key to ensuring stable communication between the device and the control system. This article introduces the parameter modification process step by step to help engineering and technical personnel and procurement personnel quickly master the configuration method.
Preparation Before Modifying Modbus Parameters
Before modifying parameters, ensure that the device is correctly wired and powered on. At the same time, prepare the Modbus master device (such as a PLC or host computer) and configuration software. Confirm basic information such as the communication address and baud rate to avoid parameter conflicts.
Required Tools and Materials
- Promag 400 flowmeter
- Modbus master device (PLC/computer)
- Configuration software (such as FieldCare, Modbus Poll)
- Communication cable (RS485)
Steps for Modifying Promag 400 Modbus Parameters
The following steps take modification through the local display interface or debugging software as an example. Specific operations may vary slightly depending on the firmware version.
Step 1: Enter the Communication Settings Menu
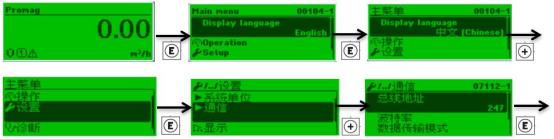
- On the measurement screen, press the "E" key to enter the main menu.
- Use the arrow keys to select "Setup" > "Communication" > "Modbus".
- Press the "E" key to confirm and enter the Modbus parameter list.
Step 2: Modify Key Modbus Parameters
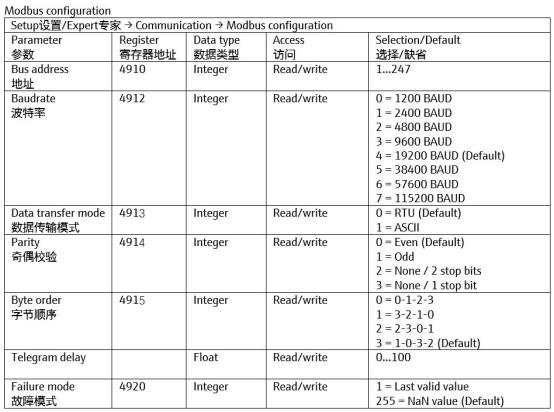
Modify the following parameters one by one according to system requirements. After modification, save and restart the device for the parameters to take effect.
| Parameter Name | Description | Typical Value |
|---|---|---|
| Slave Address | Unique identifier of the Modbus slave | 1~247 |
| Baud Rate | Communication rate | 9600/19200/38400 |
| Data Bits | Number of data bits | 8 |
| Stop Bits | Number of stop bits | 1/2 |
| Parity | Parity check | None/Even/Odd |
Step 3: Save and Restart
- Press the "E" key to save the modifications.
- Return to the main menu and select "Restart Device" or power off and restart.
- Wait for the device initialization to complete.
Verify Modbus Communication
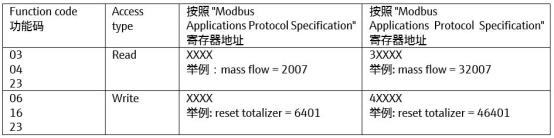
After modifying the parameters, verify whether communication is normal by reading data through the Modbus master. Tools such as Modbus Poll can be used to send read commands and check whether the response data is correct.
Common Problems and Troubleshooting
- Communication failure: Check whether the slave address and baud rate are consistent.
- Data error: Confirm the parity mode and data bit settings.
- No response: Check the wiring polarity and terminating resistor.
Summary
Correctly modifying the Modbus parameters of the Promag 400 is the foundation for ensuring system communication. Following the above steps and paying attention to parameter matching and verification can effectively improve debugging efficiency. For more detailed register mapping, please refer to the official manual.