
Promass 10 Installation and Wiring Overview
Promass 10 is a Coriolis mass flowmeter. Correct installation and wiring are key to ensuring measurement accuracy and long-term stable operation. This article provides step-by-step guidance for reference by engineering technicians and procurement personnel.
Before installation, please confirm that the pipeline has been depressurized and cleaned, and prepare the necessary tools and cables.
[Click the image to enlarge]
Installation Steps
1. Installation Location Selection
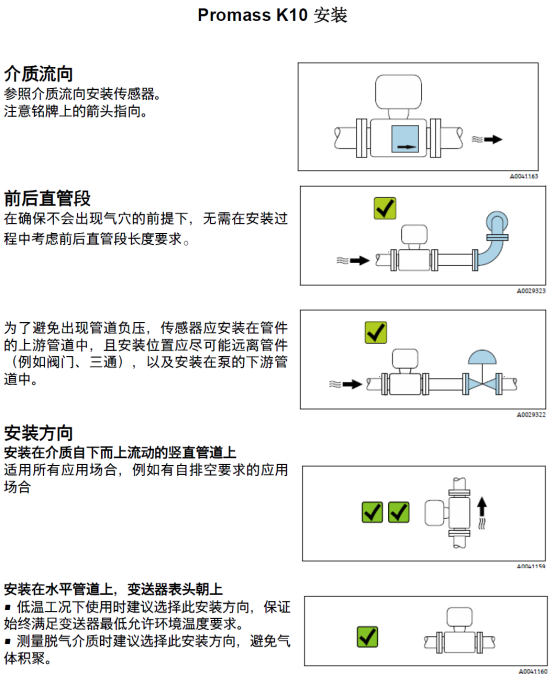
- Avoid installing at the highest point of the pipeline to prevent gas bubble accumulation.
- Avoid installing at the lowest point of the pipeline to prevent sediment accumulation.
- Ensure the sensor is completely filled with liquid. Vertical installation is recommended, with flow direction from bottom to top.
- Leave enough space for wiring and maintenance.
2. Pipe Connection
- Ensure the pipeline and sensor diameters match to avoid stress transmission.
- Use appropriate gaskets and tighten flange bolts evenly.
- For small-diameter sensors, it is recommended to use support brackets to reduce vibration effects.
3. Installation Direction and Position
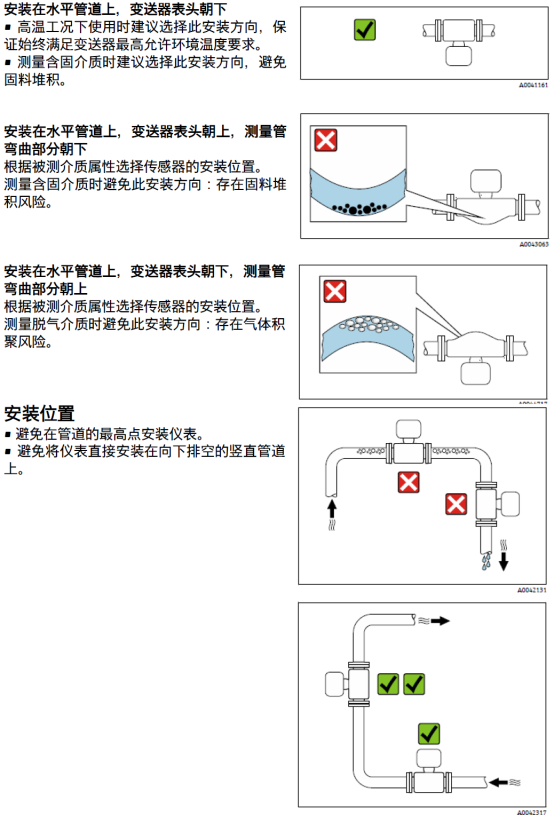
Depending on the measured medium and process conditions, horizontal or vertical installation can be selected. For horizontal installation, the sensor should be located on the side of the pipeline to avoid the influence of gas bubbles or sediment.
[Click the image to enlarge]
Electrical Wiring
1. Wiring Preparation
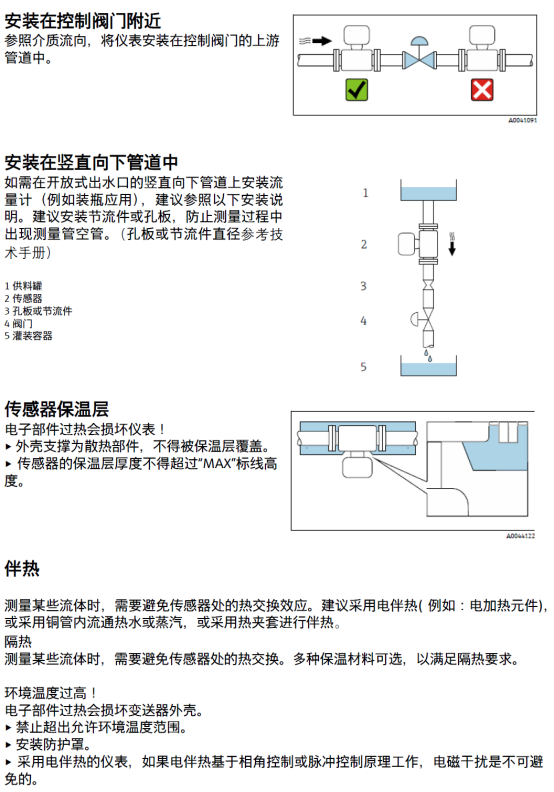
- Confirm that the power supply voltage matches the transmitter nameplate.
- Use cables that meet specifications and ensure cable entries are sealed.
- Disconnect the power supply to ensure safe operation.
2. Wiring Steps
- Open the transmitter housing and locate the terminal block.
- Connect the power line, signal line, and ground line according to the wiring diagram.
- Ensure the terminals are tightened to avoid loose connections.
- Reinstall the housing and tighten the cover.
[Click the image to enlarge]
3. Wiring Precautions
- Signal lines should use shielded cables, with the shield grounded at one end.
- Route power lines and signal lines separately to avoid interference.
- The grounding resistance should be less than 10Ω to ensure safe grounding.
Common Issues and Parameter Reference
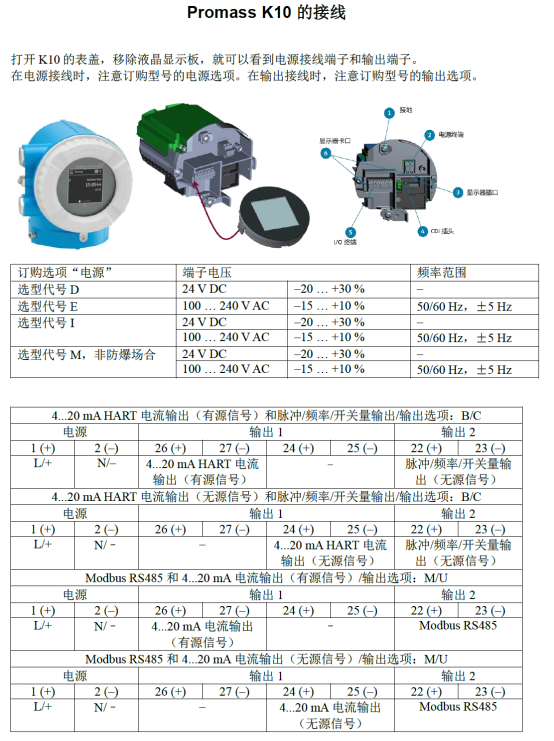
| Item | Parameter/Requirement |
|---|---|
| Power Supply Voltage | 24 VDC or 220 VAC (depending on model) |
| Signal Output | 4-20 mA / HART / Pulse |
| Ambient Temperature | -40°C to +60°C |
| Protection Rating | IP67 (standard) |
[Click the image to enlarge]
Summary
Following the above installation and wiring steps can ensure accurate measurement and extend the service life of the Promass 10 flowmeter. If you have any questions, please refer to the product manual or contact technical support.