
Promass 10 Date and Time Modification Overview
Promass 10 is a Coriolis mass flowmeter launched by Endress+Hauser, widely used for high-precision flow measurement of liquids and gases. The instrument's internal clock is used to record timestamps for event logs, data archiving, and diagnostic information, so date and time calibration is a basic operation in daily maintenance.
When the instrument has been powered off for a long time, the electronic module has been replaced, or it is put into use across time zones, the date and time may deviate and need to be manually modified on site. The specific operation process is described below.
Preparation Before Operation
Necessary Tools and Permissions
- Promass 10 transmitter local display module (or FieldCare/DeviceCare commissioning software)
- Instrument operation permission: need to enter the access code to enter the expert or maintenance level menu
- Confirm the current time reference (local time or UTC) to avoid repeated modification
Precautions
- Modifying the date and time will not affect the accumulated flow value, but it will change the timestamps of subsequent event records
- It is recommended to operate during non-metering settlement periods to avoid conflicts with batch records
- After the operation is completed, it is recommended to record the time before and after modification for audit traceability
Steps for Modifying Date and Time
Step 1: Enter the Setup Menu
- On the Promass 10 display interface, press the E key to enter the main menu.
- Use the arrow keys to select the Setup or System menu item.
- Enter the access code to enter the Date/Time submenu.
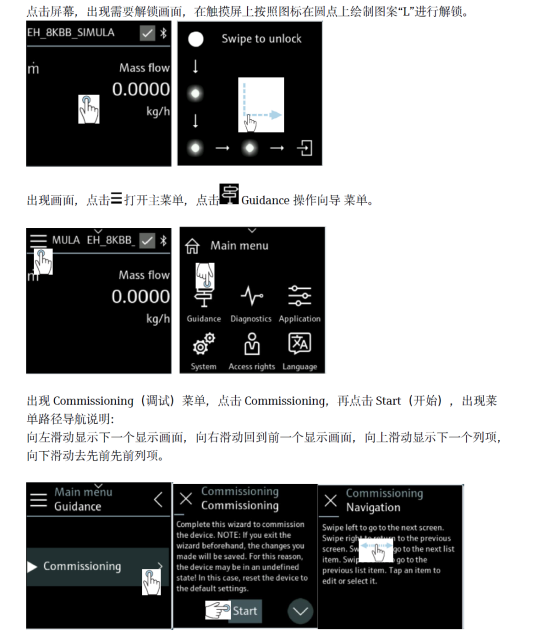
[Click the image to enlarge]
Step 2: Enter the New Date and Time
- Select Set date and enter the year, month, and day digit by digit in the format YYYY-MM-DD.
- Select Set time and enter the hour, minute, and second in the format HH:MM:SS.
- Confirm whether the time zone and daylight saving time settings are consistent with the actual situation.
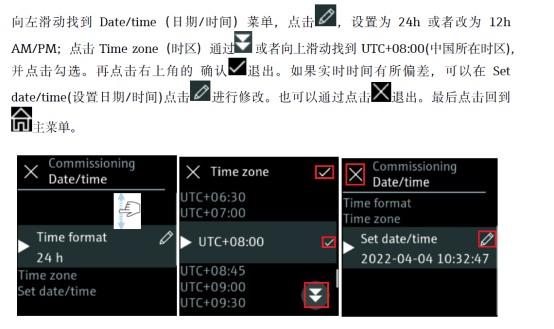
[Click the image to enlarge]
Step 3: Save and Confirm
- Press the E key to confirm the entered values, and the screen prompts the save option.
- Select Save, and the instrument writes the new time and returns to the upper-level menu.
- Return to the main interface to check whether the displayed time has been updated correctly.
Comparison of Common Parameters and Setting Items
| Setting Item | Description | Typical Value/Format |
|---|---|---|
| Set date | Set the current date | YYYY-MM-DD |
| Set time | Set the current time | HH:MM:SS |
| Time zone | Time zone selection | UTC+08:00, etc. |
| DST | Daylight saving time switch | On / Off |
Post-Operation Verification and Recommendations
After the modification is completed, it is recommended to check whether the timestamps in the event log are updated synchronously, and confirm that there is no abnormal jump in the data archive records. If the instrument is connected to FieldCare or a DCS system, the host computer time needs to be checked synchronously to avoid data reconciliation difficulties caused by time inconsistency.
For trade settlement or batch metering scenarios, it is recommended to include time calibration in the regular maintenance plan and retain the operator and time information in the calibration record to meet quality traceability requirements.